Data Loader and Apache Log4j2 Vulnerability

Due to the recent Apache Log4j2 common vulnerabilities and exposure (CVE), Salesforce Data Loader users will need to re-install desktop app. This is not to be mistaken for Data Loader IO.

The December, 2021 (API version 53) from Salesforce resolves the security breach, and will better protect your org from hackers. The below information can be used by administrators for
making this critical update. Installing data Loader and other Java considerations link

Begin by uninstalling the older version of Data Loader from your Mac or PC. Then follow these steps for Installing to the latest version of Data Loader (API v. 53.0.2 or later). Version 53.0.01 doesn't cover several CVEs.
Log into your Salesforce org.
Go to Setup > Data Management > Data Loader to see this screen with links: (downloads folder) or get it from GitHub – link 

If this isn't available from the Setup menu, then the profile does not have access to Data Loader.
The CVEs do not affect JDK directly according to Azul's site – link here. So reinstalling JDK is not necessary.

Below is a video on how to install Data Loader for your MAC or PC:

These steps do not completely protect your org from Log4J2 attacks. I would recommend that your administrators regularly check over your org's Flow Application Error, Apex Errors and other system automated logging email notifications. If you see suspicious inputs for failed processes with a string such ${jndi: where it doesn't  belong, then you know there's a vulnerability that Salesforce is yet to resolve (or doesn't know about).  Opening a case with Salesforce will help bring attention to that security threat. Guest User licenses and other unauthenticated users are also avenues would-be hackers have used in their attempts to hack Salesforce orgs.

SCREEN FLOW: SINGLE-SELECT DATA TABLE (LWC) ⚡ 

Configuring Lightning Web Component (LWC)

The last post showed us how to set up a simple Lightning Aura Component from the Dev Console.  The same can be done using the LWC library to keep things as modern as possible. These are only accessible from an text editor or IDE.  The next example will be on the Opportunity object. As before, the text in red can be modified to fit your business use case.

# 1: HTML File: Update line 5 so list variable describes your object

<template>
    <div style="height: 400px;">
        <lightning-datatable
                key-field="id"
                data={OpportunityList} 
                columns={columns}
                max-row-selection="1"
                onrowselection={handleRowSelection}>
        </lightning-datatable>
    </div>   
 </template> </template>

# 2: JavaScript Controller: 

import { LightningElement, api } from 'lwc';
const cols = [
                {label : 'Name', fieldName : 'Name', type : 'text'},
                {label : 'Amount', fieldName : 'Amount', type : 'currency'},
                {label : 'Close Date', fieldName : 'CloseDate', type : 'date'},
                {label : 'Stage', fieldName : 'StageName', type : 'text'}
             ];
export default class OpptyDataTable_LWC extends LightningElement {
    @api OpportunityList= [];
    @api selectedOpptyRecord;
    columns = cols;
    handleRowSelection(event) {
        this.selectedOpptyRecord = event.detail.SelectedRows;
    }
}
# 3: XML File: 
  "extends": ["@salesforce/eslint-config-lwc/recommended"],
  "overrides": [
    {
      "files": ["*.test.js"],
      "rules": {
        "@lwc/lwc/no-unexpected-wire-adapter-usages": "off"
      }
    }
  ]
}
# 4: JSON File: 
<?xml version="1.0" encoding="UTF-8"?>
<LightningComponentBundle xmlns="http://soap.sforce.com/2006/04/metadata">
    <apiVersion>52.0</apiVersion>
    <isExposed>true</isExposed>
    <targets>
        <target>lightning__FlowScreen</target>
    </targets>
        <targetConfigs>
        <targetConfig targets="lightning__FlowScreen">
            <property name="OpportunityList" type="@salesforce/schema/Opportunity[]" role="inputOnly"/>
            <property name="selectedOpptyRecord" type="@salesforce/schema/Opportunity" role="outputOnly"/>
        </targetConfig>
    </targetConfigs>
</LightningComponentBundle>
The same configuration steps (as described for Aura tables) can be taken to configure this to display in Lightning Flows.

Screen Flow: Single-Select Data Table (Aura) for referencing downstream

Aura Configuration 

Data Tables are useful from a user perspective in Salesforce Screen Flows. If you want to reference a table from a Flow screen, you can use sObject Collection variables to populate that table. That collection can be instantiated using a flow "Get Records" element, or SOQL in an Apex class or trigger.  Administrators and devs without access (or don't care for IDEs) can develop an Aura Data Table from the Developer Console instead.  This code can also be modified to be multi-select as well. 

Start by creating your Lighting Aura Component.

Your Name > Developer Console > File > New > Lightning Component

Then make updates to the various files. The red values can be update to match your object and fields.

# 1: Component 

<!– AURA DATA TABLE FOR UTILIZATION IN FLOWS –> 

<aura:component implements="lightning:availableForFlowScreens">

<aura:attribute name="columns" type="List"/>

<aura:attribute name="contactList" type="Contact[]"/>

    <aura:attribute name="selectedContact" type="Contact"/>

<aura:handler name="init" value="{!this}" action="{!c.doInit}"/>

<lightning:datatable keyField="Id"

                         data="{!v.contactList}"

                         columns="{!v.columns}"

                         maxRowSelection="1"

                         onrowselection="{!c.handleRowSelection}"/>           

</aura:component>

# 2: JavaScript Controller 

({

doInit : function(component, event, helper) {

        /* Define table headers: Id, Name, Work Email, Gender, Brewer Name */ 

        var cols = [

                          {label : 'Contact Full Name', fieldName : 'Name', type : 'text'},

                         {label : 'Work Email', fieldName : 'Email', type : 'Email'}, 

                          {label : 'Gender', fieldName : 'Gender__c', type : 'text'}, 

                          {label : 'Brewer', fieldName : 'Brewer_s_Name__c', type : 'text'}

                        ]; 

  /* Adding parent data as columns: https://salesforce.stackexchange.com/questions/200761/parent-field-in-lightning-datatable */     

  /* Step 2: Assign defined columns to columns variable. These will display on screen */ 

        component.set('v.columns',cols);

},

     /* This portion handles selecting a record from the table's radio button */

    handleRowSelection : function(component, event, helper) {

        var selectedContact = event.getParam('selectedRows');

/* The below alert is for testing only (using popup alert). */

           /* alert('selectedContact = '+JSON.stringify(selectedContact));   */  

           component.set('v.selectedContact', selectedContact[0]);

    }

})

# 3: Helper file – No changes from template

({

helperMethod : function() {

}

})

# 4: Style file – no changes from template

# 5: Documentation – whatever you want to add

<aura:documentation>

        <aura:description>Documentation</aura:description>

       <aura:example name="ExampleName" ref="exampleComponentName" label="Label">

                         Stuff here 

</aura:example>

</aura:documentation>

#6: Renderer – no changes from template 

# 7: SVG – no changes from template


Back within the Flow Screen Element: 

Drag the table onto the screen element and configure the fields:

  • API Name: Anything_you_want
  • sObject Collection: {Name of the Collection in Get Records Element}

Under "Advanced":

  • Manually assign variable = TRUE
  • Selected Contact = (Create a record variable of same object type and place here)
  • Refresh inputs = Whichever you prefer

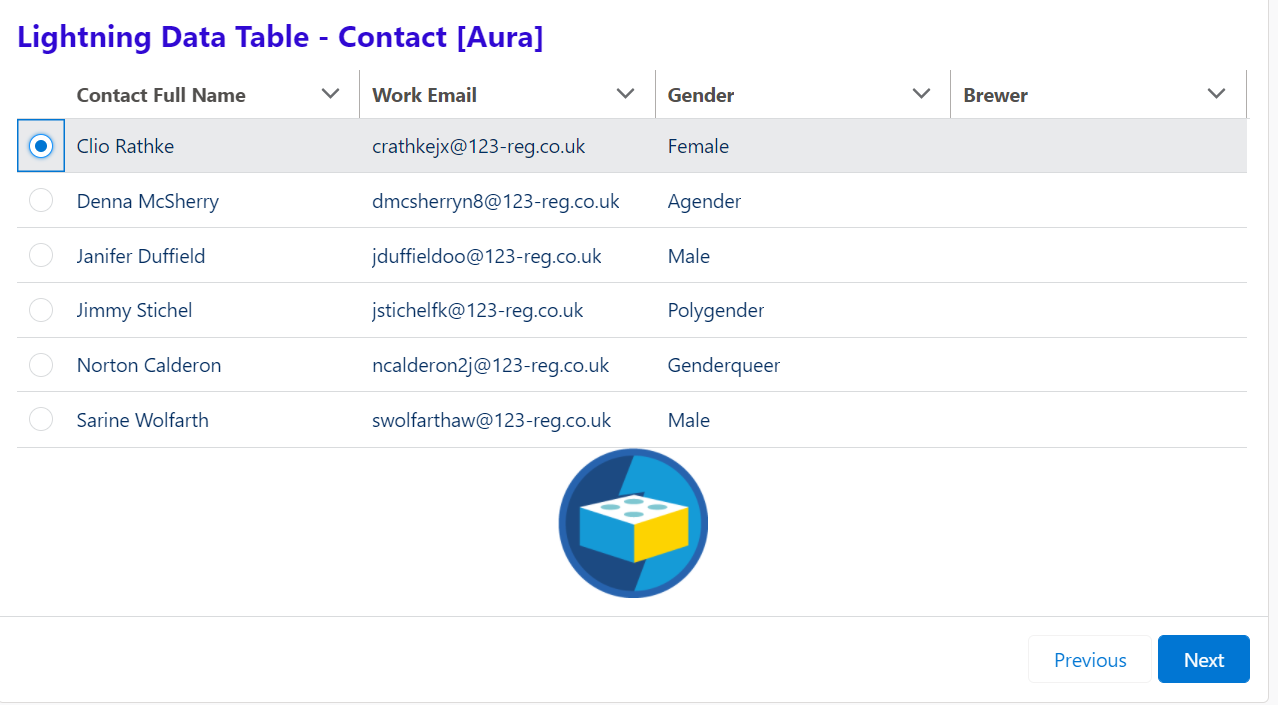
This is how the table will display at runtime. (I added a custom header and imbedded an Aura image on the flow screen.


After selecting a record from the radio options, for example "Clio Rathke", you can debug the flow and use the queried fields in the next set of operations within the flow. Be sure that any fields that are re-referenced down-stream were instantiated from the "Get Method" or "Get Records" operation upstream to avoid errors. The output would look something like this:


Outputs:
selectedContact = selectedContact ([Contact (Title:null, Gender__c:Female, Id:0036g00001hbqDOAAY, Email:crathkejx@123-reg.co.uk, Brewer_s_Name__c:null, Name:Clio Rathke)])